Efficient building a monorepo on Azure DevOps
Optimize a build process in a monorepo in Azure DevOps using all new features like Yaml pipelines, Pipeline Artifacts, Cache Beta, and Azure's Rest API.
For a while, I’ve been working in a monorepo. With a monorepo I mean, we choose to put all the code of an entire website in one repository. This code contains NET code for Sitecore, Angular single-page apps, styling with Sass, and some migrated legacy code from AngularJS. Yes, even the legacy code is in the repository.
As it happened

In the beginning, this kind of repository starts small, but after a few months, it starts growing and growing. All the problems that you’ll find on the internet about monorepos arise. In this post, I’ll describe how we tried to solve the build performance that was rising to over an hour to manage it back to being on average on 12 minutes.
Situation report
As mentioned before the repository consists of .NET, Angular, AngularJS, and Sass code. All have their specifics. The .NET code is one big solution with a growing number of projects, at the moment of writing this, it’s at 90 projects. Many of them are not related to each other, as we follow the Helix principles of Sitecore .
.
The Angular code is brand new and uses NX to optimize all building and testing tasks. Angular uses lots of Node modules, which are heavy on Windows but working nicely on a Linux environment. This last is also applicable for Sass and AngularJS code.
Use the right hardware for the job
Building a .NET solution with MSBuild can be done with a lot of flags, one of them is to use all the core on the build agent. One requirement, you’ll need cores. Cores come with extra money off course, but on a Sitecore Helix based solution, more cores are better. Typically I would go for at least 8 cores.
Build client-side code, like Angular or Sass, is a quite different story. In this case, all the cores on your Windows build agent will lose it from a much cheaper Linux build agent. We had an 8 cores Windows build agent, which was slower than the 2 core hosted Ubuntu build agent of Azure DevOps. In the case of money, build your client-side code on a Linux based environment. That’s why these guys work on a MacBook, not only because it’s fancy. If you here for 2 or more cores, it depends on your needs, the more is better. But keep in mind that not all node task runners support multi-core when running their tasks. If you want to run multi-core, take a look at Nx.
Minimize network traffic
On a build agent, you want as least as possible network traffic. Network traffic costs time and time is what we want to save. A few tips on this:
- Use
git fetch depth 1, as a monorepo can get large, we often still need just the latest version of the code to build. - Use
npm ciinstead ofnpm install, see this link - Use npm install argument
--no-auditand--prefer-offline, they both save a lot of network traffic. If you want to do an audit on your npm package run a separate task npm audit to show all your vulnerabilities, but not every npm install.
For more information on how to get the best performance with NPM check this blog
Use the right strategy for the job
Building a pipeline for a monorepo can be challenging. Think about what can be done in parallel and what must be sequential. In the case of monorepo with .NET, Angular, Sass, and AngularJS code, nothing depends on other artifacts. Who is responsible for the final deployment package? Usually, we would say it’s the .NET build, whereas we deploy it to an Azure WebApp as a web deploy package.
The first challenge over here, how do we make one package of those 90+ web application projects. Let’s first start by not creating 90 web deploy packages, but let all the projects publish their artifacts to disk e.g. $(Build.ArtifactStagingDirectory)\wwwroot. Later on, we will use this again.
Next challenge: how are we going to get all the compiled Sass and Angular code fitting in this picture. This code is not part of the .NET code structure but lives in separate folders in the repository.
This can be done by using the wpp.target files as I wrote before in this previous blog post. However, this makes the .NET code dependent on all the client-side code. This is not what you want, because it makes things slow. We solve this by using a .NET core project. In this project, we have ItemGroups describing the mapping between the client-side dist folders and the webroot. With a dotnet publish -o <path> to the webroot folder all files will be copied to the webroot folder.
<ItemGroup Label="Angular Apps">
  <Content Include="..\..\..\..\client\angular\dist\apps\\**" CopyToPublishDirectory="PreserveNewest"
           Link="assets\scripts\apps\%(RecursiveDir)%(Filename)%(Extension)" />
</ItemGroup>
Azure DevOps tasks and API’s
The last piece of this puzzle is Azure DevOps and its features we can use to run optimally.
DevOps Yaml pipelines
To run in an optimal way we use the relatively new Yaml pipelines in Azure DevOps. All that we do can also be achieved in classic mode, but I prefer Yaml.
In this Yaml pipeline, there are several split-ups to make. The most important here is jobs. Jobs can be dependent on each other. If you do not specify this dependency they will run in parallel, if possible. You must be able to run multiple agents at the same time. All the different code chunks we have, .NET, Angular, Sass, AngularJS run in different jobs. In a job, we can specify the agent pool on which this job needs to run. For .NET we choose the 8 cores Windows machine, for client-side jobs the Ubuntu 2 core machines. In the end, we create one job to merge it all and create a web deploy package for it.
Pipeline Artifacts
Pipeline artifacts is a task and will be the successor of the Publish Build Artifacts task. It’s blazing fast and uses new techniques to achieve this. We will use it at the end of all separate jobs to upload the output. Even on a .NET webroot of 130MB, it’s a matter of seconds to upload this. In the merge job on the end, the download pipeline artifacts task is used. This downloads the artifact amazingly fast as well.
Cache Beta
This task is at the time of writing this blog still in preview. Following the documentationwe should use this to cache the NPM cache. This is done by uploading the cache at the end of the job and downloading it again at a repetitive run, when the key, which you can provide, is the same. In my test runs. This explained scenario didn’t give me many benefits.
Optimize the optimizing task
When reading the previous, DevOps is trying to optimize the NPM install. But what is faster than a fast npm install? Don’t execute the NPM install when it is not needed. But how do we know it is not needed?
In git, a folder shows the last commit id that is made in that folder, recursively. With this in mind, we can use the commit id as a cache key of the Cache Beta task. If we can cache even the build output, we do not have to execute the npm install/NuGet restore and all related build tasks. Not having to execute the tasks is always faster than needing to execute them.
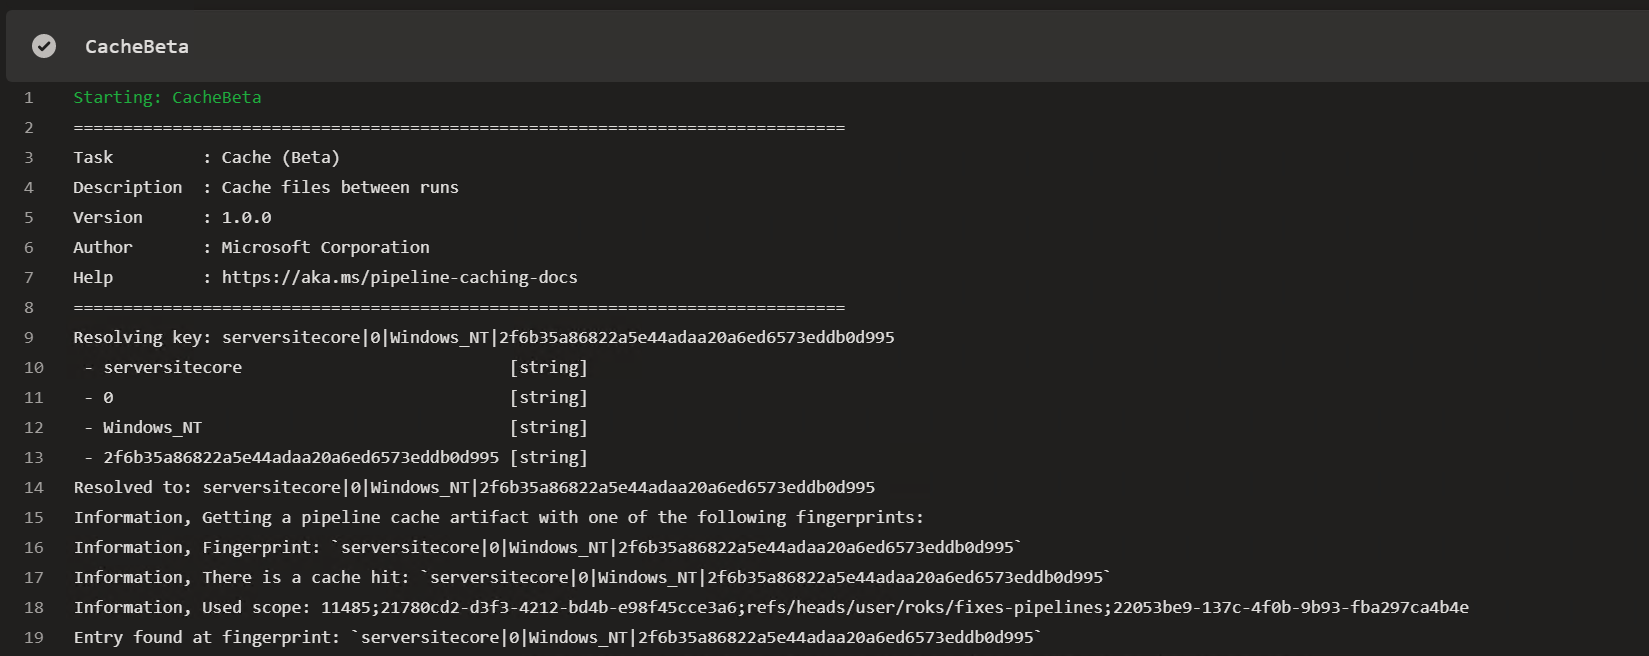
How can we get the commit ids of folders? A good approach for this is to use the Azure DevOps API. This API is as big as DevOps itself. Put this API call in a Powershell script and combine it with the Cache Beta task. For that, a Yaml step template can be used in all jobs.
parameters:
  path: ""
  artifact: ""
  key: "0"
  outputPath: ""
  cacheHit: ""

steps:
  - powershell: |
      function GetCommitId([string] $path)
      {
        $branch = $env:BUILD_SOURCEBRANCH
        $branch = $branch -replace "refs/heads/", ""
        $repository = $env:BUILD_REPOSITORY_NAME
        $currentCommitId = $env:BUILD_SOURCEVERSION
        [uri] $DevOpsRestCommitUri = $env:SYSTEM_TEAMFOUNDATIONCOLLECTIONURI + "/" + $env:SYSTEM_TEAMPROJECT + "/_apis/git/repositories/$repository/commits?searchCriteria.itemPath=$path&api-version=5.1&searchCriteria.itemVersion.versionType=commit&searchCriteria.itemVersion.version=$currentCommitId&top=1"
        Write-Host $DevOpsRestCommitUri
        $Response = Invoke-RestMethod -Uri $DevOpsRestCommitUri `
              -Method Get `
              -ContentType "application/json" `
              -Headers @{Authorization = "Bearer $env:SYSTEM_ACCESSTOKEN"}
        return $Response.value[0]. commitId
      }
      $paths = "${{ parameters.path }}"
      $option = [System.StringSplitOptions]::RemoveEmptyEntries
      $paths.Split(";",2, $option) | ForEach {
       $commitId += GetCommitId -path $_
      }
      $commitVar = "${{ parameters.artifact }}_commitId"
      Write-Host "##vso[task.setvariable variable=$commitVar]$commitId"
    displayName: GetCommitId
    env:
      SYSTEM_ACCESSTOKEN: $(system.accesstoken)
  - task: CacheBeta@1
    displayName: CacheBeta
    inputs:
      key: "${{ parameters.artifact }} | ${{ parameters.key }} | $(Agent.OS) | $(${{ parameters.artifact }}_commitId)"
      path: "${{ parameters.outputPath }}"
      cacheHitVar: "${{ parameters.cachehit }}"
The cachehit parameter that will be used as a cacheHitVar, will be used as a condition on all consecutive tasks. 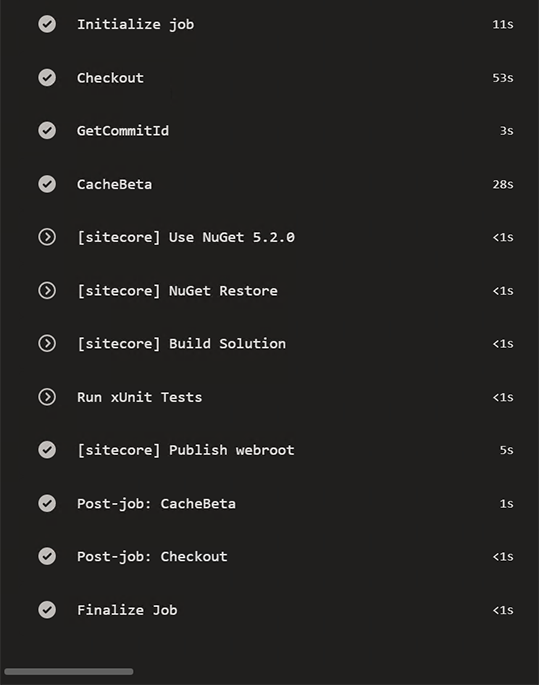
Merging all together
When all code is built and all have uploaded their artifacts, the merge job will start. Here it starts with downloading all pipeline artifacts. The .NET code will be downloaded to a folder that will serve as the webroot folder. After that the .NET Core publish will be executed to get all the clientside artifacts in the right place of the webroot. Note, that this project also can be used during development mode.
When everything is in place we create a web deploy package of it all, again with a Powershell script.
param(
   [Parameter(Mandatory=$True)]
   [string]$WebRootFolder,
   [Parameter(Mandatory=$true)]
   [string]$ParametersXmlFile,
   [Parameter(Mandatory=$true)]
   [string]$OutputFile
)
Write-Host "create msdeploy package from extracted files"
$msdeploy = "C:\Program Files\IIS\Microsoft Web Deploy V3\msdeploy.exe"
$verb = "-verb:sync"
$source = "-source:iisApp="$WebRootFolder""
$declareParam = "-declareparam:name="IIS Web Application Name",kind=ProviderPath,scope=IisApp,match="
$declareparamfile = "-declareparamfile="$ParametersXmlFile""
$escapedWebRootFolder = $WebRootFolder.Replace("\","\\")
$replace = "-replace:match='$escapedWebRootFolder',replace='website'"
$destination = "-dest:package="$OutputFile""
Write-Host "invoking msdeploy"
Invoke-Expression "& '$msdeploy' --% $verb $source $destination $declareParam $declareparamfile $replace"
Hope it helps!